Transform your tiny outdoor space into a thriving garden oasis by mounting vertical planters on sunny walls, creating a cascading display of herbs, flowers, and compact vegetables. Stack weatherproof crates or repurposed wooden pallets to build a space-saving vertical garden system that maximizes growing area while minimizing footprint. Install a modular drip irrigation system through recycled rain gutters to cultivate leafy greens and trailing plants along fences or balcony railings. Turn ordinary containers into self-watering planters using plastic bottles and wicking cord, perfect for busy urban gardeners working with limited square footage.
Every inch counts in small-space gardening, where clever DIY solutions can double or triple your growing capacity. Whether you’re working with a tiny balcony, narrow patio, or compact courtyard, these space-maximizing techniques help create abundant gardens in even the most challenging urban environments. Focus on lightweight, movable containers and vertical growing systems that adapt to changing light conditions and seasonal needs.
Vertical Gardening Solutions
DIY Living Walls
Transform your vertical space into a lush garden oasis with these creative DIY wall projects that maximize every inch of your small space. Here’s how to create your own living wall:
Start by gathering materials: a sturdy wooden pallet or wire mesh frame, landscape fabric, potting soil, small plants, and mounting hardware. Clean and sand your pallet if using one, then attach landscape fabric to the back and bottom to create pockets for soil.
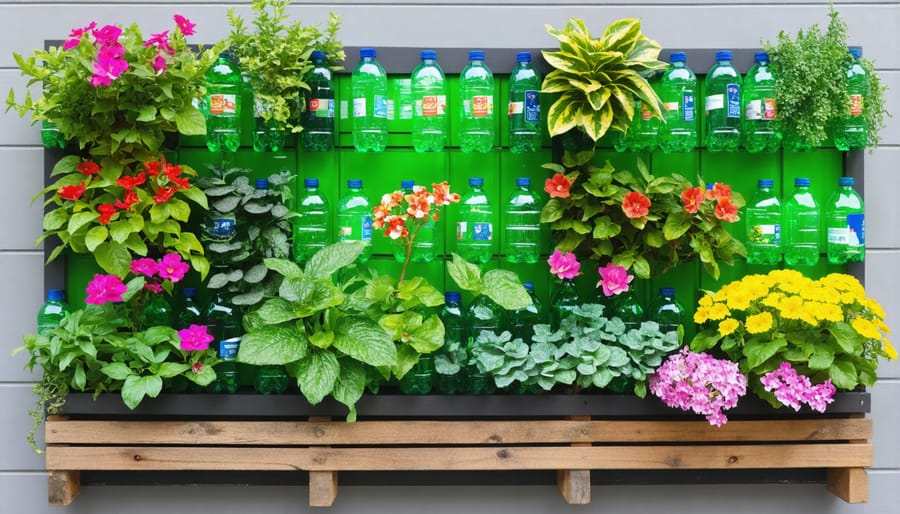
For a budget-friendly alternative, try using recycled plastic bottles. Cut them in half lengthwise, drill drainage holes, and mount them horizontally on a wooden board. Space them evenly to allow room for plants to grow.
When selecting plants, choose varieties that thrive in vertical conditions:
– Succulents and air plants for sunny spots
– Ferns and mosses for shaded areas
– Herbs for kitchen walls
– Trailing plants like pothos or ivy for cascading effects
Mount your frame securely to the wall using appropriate anchors, ensuring it can support the weight when fully planted and watered. Layer your soil and plants, starting from the bottom up. Water thoroughly but carefully to avoid overflow.
Maintenance tip: Install a simple drip irrigation system using plastic tubing and a small pump for easy watering. Regular pruning and fertilizing will keep your living wall healthy and vibrant throughout the seasons.
Pallet Garden Projects
Transform an ordinary wooden pallet into a stunning vertical garden with this space-saving project. Start by thoroughly cleaning your pallet and sanding any rough spots to prevent splinters. For longevity, apply a weatherproof sealant and let it dry completely.
Create planting pockets by stapling landscape fabric to the back and bottom of the pallet, leaving the front open. Double-layer the fabric for extra durability. Position your pallet upright against a wall or fence where it will receive appropriate sunlight for your chosen plants.
Fill the pockets with quality potting soil, working from the bottom up. Choose plants that match your space’s lighting conditions – herbs, succulents, and trailing flowers work beautifully. Plant them closely together, starting with the bottom row and working your way up. This prevents soil from washing out when watering upper rows.
Pro tip: Keep your pallet horizontal for two weeks while plants establish their roots. Water thoroughly but carefully during this period. Once the roots have taken hold, gradually move the pallet to its vertical position.
For maintenance, water your pallet garden from top to bottom, allowing excess water to trickle down through the layers. Consider installing a drip irrigation system for easier care. Regular pruning and fertilizing will keep your vertical garden thriving and looking its best throughout the growing season.
Container Gardening Innovations
Space-Saving Container Designs
Making the most of limited garden space starts with clever container solutions that maximize every inch while adding visual interest. From upcycled materials to budget-friendly DIY solutions, there’s no shortage of creative ways to grow your garden upward rather than outward.
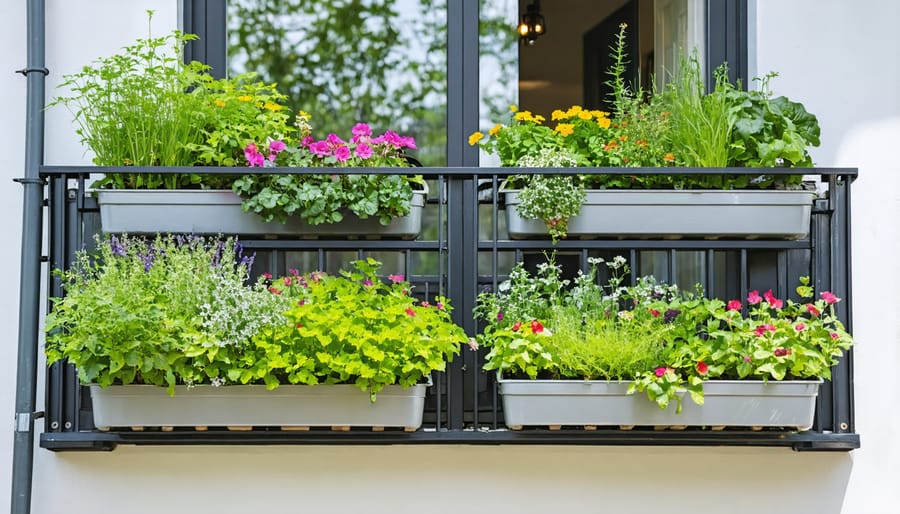
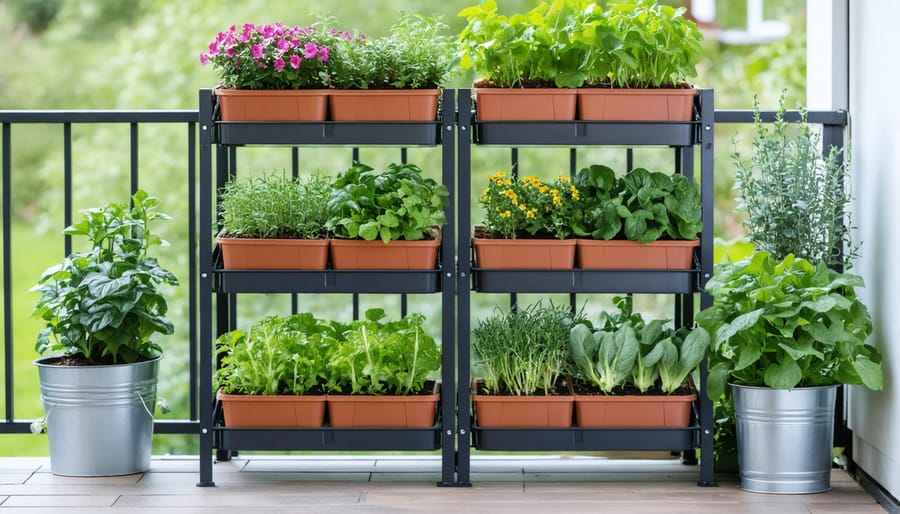
Tiered planters are game-changers for small spaces. Create a striking vertical display using graduated containers that stack neatly while accommodating different plant varieties. Try repurposing old wooden crates or terra cotta pots to build a three-tier system perfect for herbs, flowers, and trailing plants.
Hanging solutions offer endless possibilities. Install ceiling hooks or wall brackets to suspend lightweight containers filled with cascading flowers or compact vegetables. Mason jar planters, macramé holders, and recycled gutters make excellent hanging gardens that draw the eye upward while keeping floor space clear.
Think beyond traditional pots with space-saving alternatives like pocket planters, which attach directly to walls or fences. These fabric pouches are ideal for growing shallow-rooted plants and creating living wall features. For a modern twist, try mounting rain gutters horizontally to create sleek rowing channels for herbs or microgreens.
Corner spaces often go unused, but triangular tiered planters can transform these awkward spots into thriving garden zones. Build or purchase corner-specific containers that fit snugly against walls while providing multiple planting levels. Add casters to the bottom for easy mobility when seeking optimal sunlight or protecting plants from harsh weather.
Self-Watering Container Systems
Want to create a garden that practically takes care of itself? Self-watering containers are perfect for busy plant parents and small spaces. Here’s how to make your own water-wise planting system using simple materials from your local hardware store.
Start with two containers that nest inside each other – one slightly smaller than the other. The outer container will be your water reservoir, while the inner one holds your plants. Drill several ¼-inch drainage holes in the bottom of the inner container, and create one 1-inch hole for your watering tube (a piece of PVC pipe works great).
Place a strip of wicking material, like cotton rope or felt, through the drainage holes, leaving enough length to reach the water reservoir below. This will draw moisture up to your plants’ roots as needed. Add a 2-inch layer of gravel in the bottom of the inner container to create a water distribution zone.
Fill the inner container with potting mix, leaving about 2 inches at the top. Insert your watering tube, making sure it reaches the bottom of the outer container. Place your plants, keeping in mind that deep-rooted vegetables and flowers work best in self-watering systems.
Pour water through the tube until you see it in the reservoir. Check the water level weekly through the tube – when it’s low, simply refill. One reservoir typically lasts 1-2 weeks, depending on your plants and climate.
Pro tip: Add a water level indicator by floating a cork in the tube to easily monitor when it’s time to refill.
Clever Corner Solutions
Corner Trellis Gardens
Transform those awkward corners into thriving vertical gardens with a DIY corner trellis! This space-saving solution not only maximizes your growing area but also adds a stunning architectural element to your outdoor space.
Start by selecting two matching trellis panels that fit your corner’s height. Cedar or pressure-treated wood works best for durability, though powder-coated metal offers a modern alternative. Position the panels at a 90-degree angle, securing them with brackets at the top and bottom. For added stability, consider anchoring the base into concrete footings.
Choose climbing plants that match your space and sunlight conditions. Fast-growing options like sweet peas, clematis, or jasmine create quick coverage and beautiful blooms. For edible options, try growing climbing vegetables like pole beans, cucumbers, or cherry tomatoes. Plant them in well-draining soil at the trellis base, spacing them about 6 inches apart.
Pro tip: Install small planter boxes at the base of your trellis to create a dedicated growing space. Add a layer of pebbles for drainage, then fill with quality potting soil. This setup prevents the climbing plants from competing with existing garden beds.
Maintain your corner trellis garden by regularly training new growth along the supports and trimming away dead foliage. Water deeply at the base, and add slow-release fertilizer during the growing season for optimal results.
Micro Garden Nooks
Transform those forgotten nooks and tiny corners into charming micro garden sanctuaries that add personality to your space. Whether it’s an awkward corner in your balcony or a small window ledge, these intimate garden spaces can become delightful green retreats with the right approach.
Start by assessing your corner’s lighting conditions and selecting plants that will thrive there. For shaded corners, consider peace lilies, ferns, or pothos. Sunny spots are perfect for succulents, herbs, or compact flowering plants like mini petunias.
Create visual interest by layering plants at different heights. Use wall-mounted planters, hanging baskets, or tiered plant stands to maximize vertical space. Consider adding mirrors to reflect light and create the illusion of more space – a clever trick that’s becoming popular in eco-friendly home improvements.
Make your nook cozy with personal touches. Add small solar-powered fairy lights, miniature wind chimes, or a tiny water feature. Install a fold-down shelf that can double as a reading spot or morning coffee station. Use compact containers in coordinating colors to maintain a cohesive look, and consider self-watering planters to make maintenance easier.
Remember to include elements that attract beneficial insects like butterflies and bees. Mini pollinator-friendly plants such as lavender or compact butterfly bush varieties can transform your tiny corner into a thriving ecosystem.
Multi-Purpose Garden Features
Herb Garden Furniture
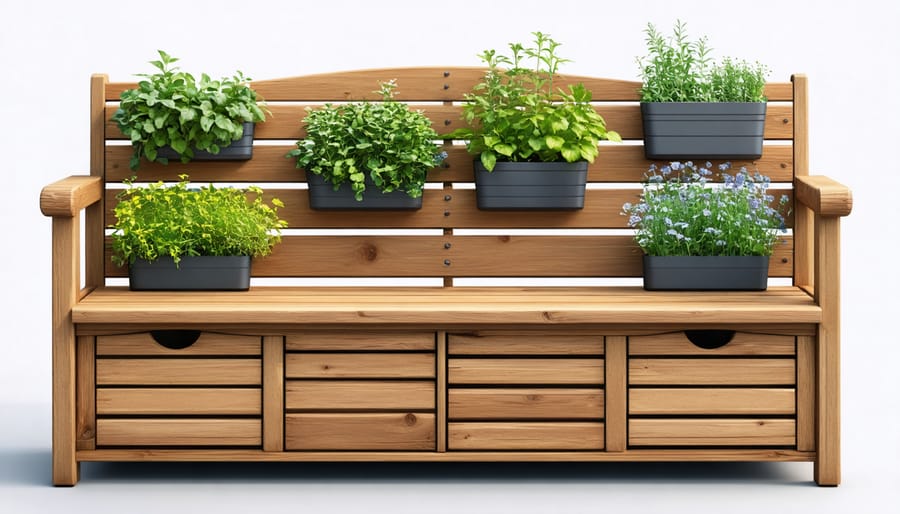
Transform your small garden space into a multifunctional oasis with clever furniture pieces that do double duty as growing spaces. With some essential DIY skills and creativity, you can craft beautiful, space-saving solutions that serve both practical and aesthetic purposes.
Start with a simple planter bench – combine a comfortable seating area with built-in planters on either end. Use weather-resistant wood like cedar or treated pine, and line the planting areas with landscape fabric before adding soil and your favorite herbs. This creates an inviting spot to relax while keeping fresh herbs within arm’s reach.
Consider building a fold-down table that attaches to your wall or fence, with integrated herb planters along the back edge. When folded up, it takes minimal space, and when down, it provides a perfect spot for outdoor dining surrounded by aromatic herbs.
Another clever option is a tiered plant stand with a built-in storage bench. The lower portion offers hidden storage for garden tools, while the ascending levels showcase your herb collection in an attractive display. Paint it in bright colors to add personality, or stick with natural wood tones for a more rustic feel.
For vertical spaces, create a hanging herb garden cabinet that opens like a medicine cabinet, revealing rows of mounted planters inside. When closed, it looks like decorative wall art; when open, it provides easy access to your fresh herbs while saving precious floor space.
Hidden Storage Solutions
In small gardens, every inch counts, and clever storage solutions can help you maintain a tidy space while maximizing your growing area. One of the smartest approaches is to incorporate storage into your existing garden features. Consider installing bench seating with hinged tops that open to reveal waterproof storage compartments – perfect for keeping garden tools, plant food, and spare pots.
Hollow decorative elements can serve double duty as both storage and focal points. Transform large ceramic pots into storage units by placing a smaller plant container inside, using the remaining space to store garden essentials. Old wooden crates can be weather-treated and mounted on walls, creating charming shelving units that double as tool storage.
Make use of vertical space by installing pegboards or tool organizers behind climbing plants. This keeps tools accessible while hiding them behind beautiful greenery. For smaller items like seeds and plant markers, repurpose old mason jars and attach them under wooden shelves or mount them on fence panels.
Don’t overlook the potential of garden walls and fences. Install weather-resistant cabinets or create custom wooden storage boxes that attach directly to your fence. These can be painted to match your garden theme and topped with window boxes for additional planting space.
Remember to weatherproof any storage solutions you create. Use water-resistant materials or add protective coatings, and ensure proper drainage to prevent water accumulation. With these clever storage ideas, you can keep your garden tools organized while maintaining the aesthetic appeal of your outdoor space.
Creating a beautiful garden in a small space isn’t just possible – it’s an exciting opportunity to get creative and make the most of every inch you have. From vertical gardens that transform blank walls into lush green spaces to clever container combinations that maximize your growing area, you now have a toolbox full of ideas to bring your small-space garden dreams to life.
Remember, starting small is perfectly fine. Begin with a single vertical planter or a few container gardens, then expand as you gain confidence. The key is to choose projects that match your space, lifestyle, and gardening experience. Don’t forget to consider multi-functional elements like herb gardens that double as kitchen decor or living walls that provide both beauty and privacy.
Most importantly, gardening should be enjoyable. Take time to experiment with different plants, arrangements, and techniques until you find what works best for your space. Whether you have a tiny balcony, a small patio, or just a sunny windowsill, there’s always room for a bit of green in your life. So grab your gardening tools, pick your favorite ideas from this guide, and start creating your own little slice of paradise today!