Transform forgotten flea market finds into stunning home decor pieces with time-tested vintage DIY techniques that blend nostalgia with modern style. Master the art of distressing furniture with chalk paint and sandpaper to create authentic wear patterns, or breathe new life into antique picture frames using metallic waxes and aged patinas. From weathered window frames repurposed as wall art to salvaged wooden crates transformed into shabby-chic storage solutions, vintage DIY decor offers endless possibilities for creating character-rich spaces without breaking the bank.
These beloved techniques don’t just save money – they preserve history, reduce waste, and infuse homes with one-of-a-kind personality that mass-produced items simply can’t match. Whether you’re a seasoned DIY enthusiast or just beginning to explore the world of vintage decor, the satisfaction of transforming overlooked treasures into conversation pieces makes every project worthwhile. Start small with simple techniques like tea-staining fabrics or aging metal with vinegar solutions, then gradually tackle more ambitious makeovers as your confidence grows.
By learning to spot potential in cast-off items and mastering basic restoration skills, you’ll develop an eye for vintage design that transforms everyday spaces into curated collections of memories and meaning. The best part? Every scratch, dent, and imperfection adds to the authentic charm of your creations.
Why Vintage DIY Decor Is Making a Comeback
The Sustainable Choice
Choosing vintage DIY decor isn’t just about creating beautiful spaces; it’s a powerful way to contribute to environmental sustainability. By breathing new life into existing pieces, you’re actively reducing waste and preventing perfectly good materials from ending up in landfills. This approach aligns perfectly with modern eco-friendly home updates while maintaining that coveted vintage charm.
Every time you restore an old piece of furniture or repurpose vintage materials, you’re reducing the demand for new manufacturing, which helps decrease carbon emissions and resource consumption. Think of those old wooden crates becoming stylish shelving units, or vintage suitcases transforming into unique side tables. Even small items like old mason jars can find new purpose as charming light fixtures or organizing solutions.
The beauty of vintage DIY lies in its infinite possibilities for upcycling. That worn-out ladder can become a stunning bookshelf, while vintage doorknobs might transform into unique coat hooks. By choosing to work with existing materials, you’re not just decorating – you’re participating in a sustainable movement that honors the past while protecting our planet’s future.
Budget-Friendly Beauty
Creating vintage-style decor doesn’t have to break the bank. While authentic vintage pieces from antique stores can cost hundreds of dollars, DIY alternatives often require just a fraction of that investment. For example, a genuine vintage farmhouse table might set you back $800-1,200, but creating your own with reclaimed wood and some budget-friendly renovation tips could cost as little as $150-200.
The savings are even more dramatic with smaller items. A vintage-style mirror with distressed finish typically costs $200-300 in boutique stores, while aging a modern mirror yourself using paint and vinegar solution costs under $30. Similarly, authentic vintage storage crates can run $50-75 each, but making them from pallet wood is practically free if you source materials wisely.
The key to successful budget-friendly vintage DIY lies in smart material sourcing. Check local thrift stores, yard sales, and online marketplaces for base items to upcycle. Remember, imperfections add character to vintage pieces, so don’t shy away from items that need a little TLC – they’re often the best candidates for transformation.
Essential Tools and Materials
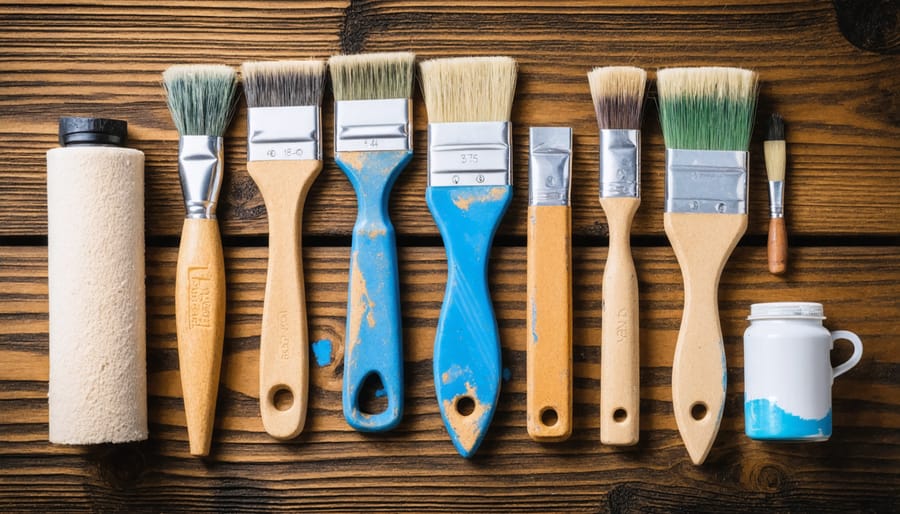
Before diving into your vintage DIY projects, gathering the right tools and materials will set you up for success. Here’s your essential toolkit for creating beautiful vintage-inspired pieces:
Basic Tools:
– Sandpaper (various grits from 80 to 220)
– Paint brushes (different sizes for details and larger surfaces)
– Steel wool (0000 grade for gentle distressing)
– Screwdrivers and hammer
– Measuring tape and level
– Wire cutters and pliers
– Putty knife
– Safety gear (gloves, protective eyewear, dust mask)
Painting and Finishing Materials:
– Chalk paint or milk paint
– Clear wax and dark wax for aging effects
– Primer for various surfaces
– White vinegar (for creating rust effects)
– Steel wool and vinegar solution for wood aging
– Clear polyurethane or sealant
Decorative Elements:
– Vintage-style hardware (knobs, handles, hinges)
– Decorative trim and molding
– Old picture frames
– Vintage fabric scraps
– Lace and burlap
– Glass bottles and mason jars
– Vintage buttons and jewelry pieces
Adhesives and Fasteners:
– Wood glue
– Strong adhesive for multiple surfaces
– Picture hanging hardware
– Small nails and screws
– Double-sided tape
– Wire for hanging
Pro Tip: Start with basic tools and expand your collection as needed for specific projects. Many of these items can be found at thrift stores, yard sales, or hardware stores at reasonable prices. Store your supplies in clearly labeled containers to keep them organized and easily accessible. Remember that quality tools, while sometimes more expensive initially, will last longer and provide better results in your vintage DIY projects.
Beginner-Friendly Vintage Projects
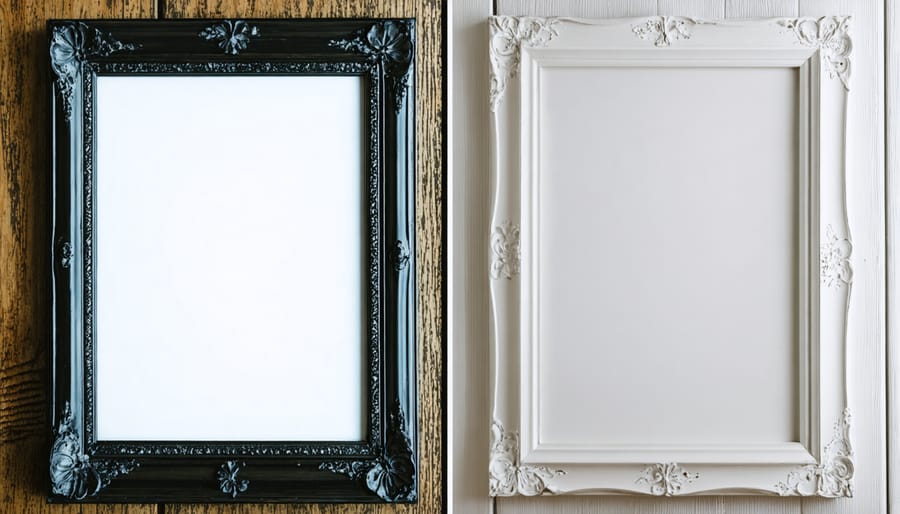
Distressed Picture Frames
Transform ordinary picture frames into charming vintage treasures with this simple distressing technique. Perfect for creating a cohesive gallery wall or adding character to your DIY wall art ideas, distressed frames add instant warmth and history to any room.
Start by gathering your materials: wooden picture frames (new or used), sandpaper (medium and fine grit), white chalk paint, dark wax or antiquing glaze, clean cloths, and a paint brush. If you’re using new frames, lightly sand the surface to help the paint adhere better.
Apply a thin coat of chalk paint using even strokes, allowing it to dry completely. For authentic vintage charm, don’t aim for perfect coverage – slight inconsistencies add character. Once dry, apply a second coat if desired, focusing on areas that would naturally receive more wear.
Here’s where the magic happens: Using medium-grit sandpaper, gently distress the edges, corners, and raised details of the frame. These are areas that would naturally wear over time. Work carefully – you can always distress more, but you can’t undo heavy sanding.
Next, apply dark wax or antiquing glaze with a soft cloth, working it into the distressed areas and along the edges. This creates depth and age-like patina. Wipe away excess with a clean cloth, leaving darker color in the recessed areas.
Finish by protecting your work with a clear wax or sealant. Let everything cure for 24 hours before inserting your artwork or photos. Remember, the beauty of vintage pieces lies in their imperfections, so embrace the uniqueness of each frame you create.
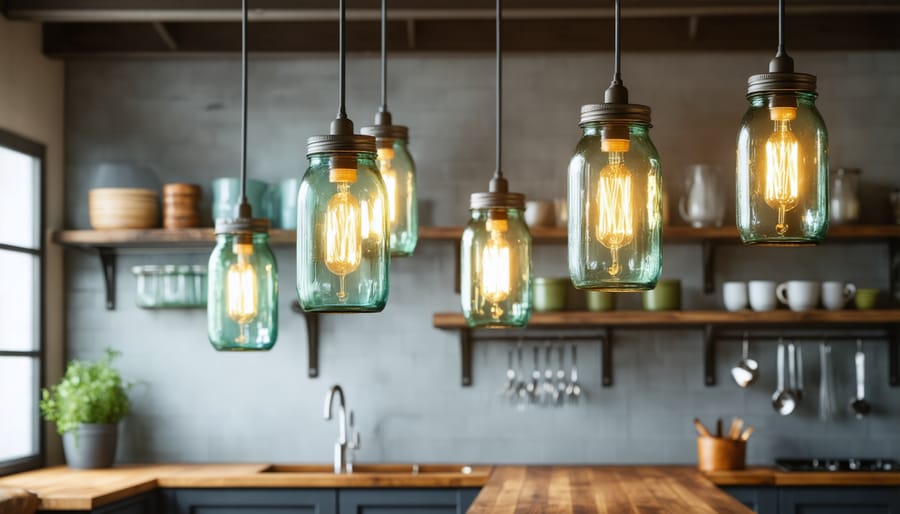
Mason Jar Light Fixtures
Transform everyday mason jars into charming vintage-inspired light fixtures with this simple yet stunning DIY project. These rustic luminaries add warmth and character to any space while maintaining that coveted vintage aesthetic.
Start by gathering your materials: mason jars (quart or pint size), pendant light kits, vintage-style Edison bulbs, wire for hanging, and basic tools like a drill with a glass bit. You can find mason jars at thrift stores or maybe even in grandma’s basement for that authentic aged look.
Begin by carefully drilling a hole in the center of each jar lid, large enough for your pendant light cord to pass through. Pro tip: Add a drop of oil to the drilling spot and work slowly to prevent the glass from cracking. Remove any sharp edges with fine-grit sandpaper.
Thread your pendant light cord through the hole, securing it with the provided hardware. For added vintage charm, choose Edison bulbs with visible filaments that cast a warm, golden glow. You can also experiment with different jar sizes and styles – blue vintage Mason jars create particularly beautiful light patterns.
Consider creating a cluster of jars at varying heights for a more dramatic effect, or line them up over a kitchen island or dining table. To enhance the vintage look, try “aging” clear jars by mixing water with white glue and food coloring for a sea glass effect.
For safety, always ensure your electrical connections are secure and consider having a licensed electrician check your work, especially if you’re new to lighting projects. These fixtures work beautifully in farmhouse-style kitchens, rustic bathrooms, or cozy reading nooks.
Advanced Vintage Transformations
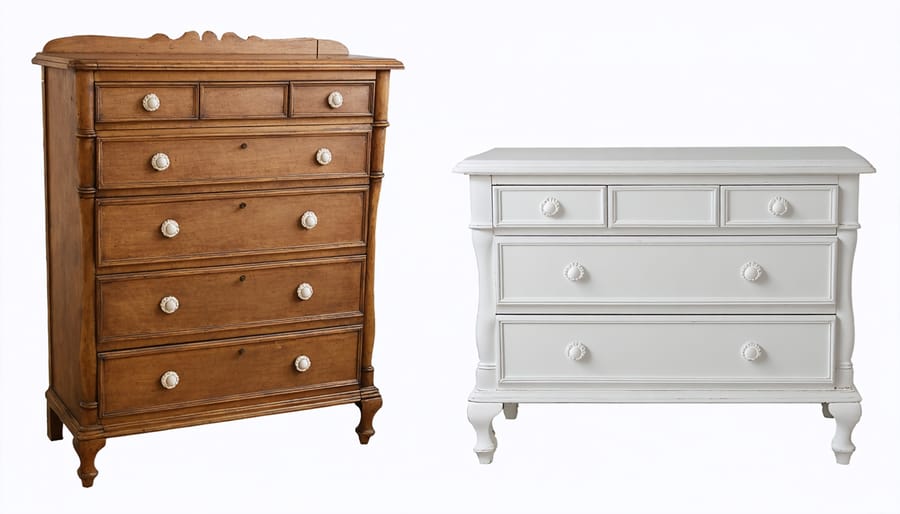
Furniture Restoration
Breathing new life into old furniture is one of the most rewarding aspects of vintage DIY decor. With some basic tools and patience, you can transform tired pieces into stunning statement items that tell a story.
Start by thoroughly cleaning your piece with a mixture of warm water and mild soap, removing all dirt and grime. Once dry, assess the current finish – if it’s damaged or peeling, you’ll need to strip it. Use a chemical stripper or sand the surface, working with the grain using medium-grit sandpaper before progressing to fine-grit for a smooth finish.
For a classic vintage look, consider these popular finishing techniques:
1. Distressed Paint: Apply two contrasting paint colors, letting each layer dry completely. Strategically sand edges and high-wear areas to reveal the bottom color for an authentically aged appearance.
2. Milk Paint: This natural finish creates a beautiful, matte look that’s perfect for vintage pieces. It can chip and crackle naturally, adding character to your furniture.
3. Dark Wax Finish: After painting, apply dark wax to create depth and age. Focus on corners, edges, and detailed areas where natural aging would occur.
Expert Tips for Success:
– Always test products on an inconspicuous area first
– Use proper ventilation when working with strippers or paints
– Invest in quality brushes for smoother application
– Take photos before starting to reference original hardware placement
– Consider updating hardware with vintage-style replacements
For pieces with good wood grain, try the traditional refinishing route: sand carefully, apply wood stain in your chosen shade, and protect with several coats of clear polyurethane. Remember to sand lightly between coats for the smoothest finish.
Don’t forget to preserve some imperfections – minor scratches and wear marks add authenticity to vintage pieces. The goal is to enhance character while making the piece functional and beautiful for years to come.
Vintage Fabric Projects
Vintage fabrics tell beautiful stories through their patterns, textures, and wear, making them perfect materials for creating unique home decor pieces. From delicate lace doilies to bold feed sacks, these textiles can breathe new life into your living spaces while maintaining their historic charm.
Start your vintage fabric journey by sourcing materials from thrift stores, estate sales, or even family heirlooms that are too damaged for their original use. Look for pieces with interesting patterns or textures, even if they have small tears or stains – these imperfections often add to the authentic vintage appeal.
Here are some beginner-friendly projects to try:
1. Vintage Fabric-Wrapped Picture Frames
Transform plain wooden frames by wrapping them in vintage fabric strips. Simply apply mod podge to secure the fabric and create a shabby-chic display for your favorite photos.
2. Throw Pillow Covers
Turn vintage tablecloths or handkerchiefs into charming pillow covers. Use envelope-style closures to avoid complicated zippers, making the project achievable for novice sewers.
3. Fabric-Covered Storage Boxes
Give ordinary cardboard boxes an elegant upgrade by covering them with vintage fabrics. These make perfect organizers for craft supplies or decorative storage solutions.
For more advanced crafters:
1. Patchwork Wall Art
Create a stunning wall piece by combining different vintage fabric scraps in a quilting-inspired design. Frame it in an antique frame for added impact.
2. Fabric-Covered Lampshades
Carefully cover plain lampshades with vintage fabric for a soft, romantic lighting effect. Use heat-safe adhesive and maintain proper spacing from bulbs.
Pro Tips:
– Always clean vintage fabrics before use
– Test for colorfastness to prevent bleeding
– Store unused pieces in acid-free tissue paper
– Consider backing delicate fabrics with interfacing for durability
Remember to handle vintage textiles with care, and don’t be afraid to mix different patterns and eras for an eclectic, personalized look.
Styling Tips and Placement
When styling your vintage DIY pieces, the key is creating a harmonious blend between old and new elements. Start by choosing a focal point in each room where your vintage piece can shine without competing with other decorative elements. This approach helps create balance while avoiding a cluttered or overwhelming appearance.
Consider the rule of threes when displaying smaller vintage items. Group pieces of varying heights and textures together to create visual interest. For example, pair a DIY vintage mason jar vase with a restored antique clock and a weathered picture frame to create an eye-catching vignette on a console table.
Color coordination plays a crucial role in integrating vintage pieces with modern décor. If your DIY project features bold vintage patterns or colors, balance it with neutral surroundings. Alternatively, if you’re working with neutral vintage pieces, feel free to place them in more colorfully decorated spaces. This technique allows you to explore affordable DIY decorating solutions while maintaining a cohesive look.
Layer your vintage pieces with contemporary items to create depth and interest. A DIY vintage ladder shelf can display both antique books and modern ceramics, while a restored vintage trunk can serve as a coffee table topped with current magazines and decorative objects.
When it comes to lighting, position vintage pieces where natural light can enhance their unique characteristics. Place mirrors strategically to reflect light and showcase the patina of aged materials. For larger vintage furniture pieces, ensure they don’t block natural light sources or impede traffic flow.
Remember that negative space is your friend. Don’t feel compelled to fill every corner with vintage items. Sometimes, allowing a statement piece to breathe gives it more impact and prevents your space from feeling like an antique shop rather than a lived-in home.
Embarking on your vintage DIY decor journey is more than just creating beautiful pieces for your home – it’s about connecting with the past, expressing your creativity, and building a sustainable approach to home decoration. As we’ve explored throughout this guide, transforming ordinary items into extraordinary vintage treasures doesn’t require professional expertise or a hefty budget.
Remember that the key to successful vintage DIY projects lies in patience, attention to detail, and embracing imperfections. Whether you’re starting with simple techniques like distressing and antiquing or ready to tackle more complex projects like furniture restoration, each piece you create adds a unique story to your home’s narrative.
Don’t be afraid to experiment with different styles and techniques. The beauty of vintage DIY decor lies in its versatility – from shabby chic to industrial vintage, there’s a style that matches every taste and home aesthetic. Start small with manageable projects, and as your confidence grows, challenge yourself with more ambitious undertakings.
Keep sustainability in mind as you source materials. Thrift stores, flea markets, and yard sales are treasure troves of potential projects waiting to be discovered. By giving new life to old items, you’re not just creating beautiful decor – you’re contributing to a more sustainable future.
Now that you have the knowledge and inspiration, it’s time to start your vintage DIY adventure. Remember, every experienced DIY enthusiast started exactly where you are now. With creativity, determination, and the techniques we’ve shared, you’re well-equipped to transform your living space into a charming vintage haven that reflects your personal style and craftsmanship.