Transform your living space with a custom-built modular sofa that perfectly fits your needs and budget. Building your own sectional seating isn’t just one of many modular furniture projects – it’s a practical way to create exactly what you want while saving thousands of dollars. With basic woodworking skills and the right materials, you can construct individual modules that connect seamlessly to form a fully customizable seating arrangement.
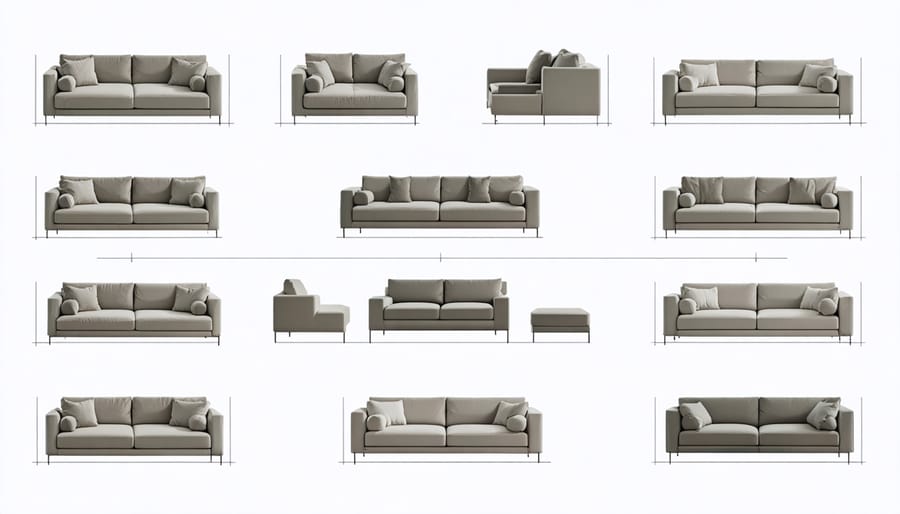
Start by designing your ideal configuration on paper, factoring in room dimensions and traffic flow. Standard modules typically measure 30 inches deep by 30 inches wide, with back heights ranging from 30-36 inches. This modular approach allows you to add, remove, or rearrange sections as needed, making it perfect for spaces that evolve over time. Whether you’re crafting a compact loveseat or an expansive sectional, this guide will walk you through creating professional-quality furniture that’s built to last.
Essential Planning and Design
Measuring Your Space
Before diving into construction, accurate measurements are crucial for creating a modular sofa that fits perfectly in your space. Start by clearing the intended area and using a tape measure to determine the maximum length, width, and depth available. Remember to leave enough room for walkways – typically 30-36 inches for comfortable traffic flow.
Sketch your room layout on graph paper, marking doors, windows, and other permanent fixtures. This helps you visualize how to best maximize your space while ensuring your modular design works harmoniously with existing elements.
Consider the dimensions of each module individually – standard measurements are typically 30-36 inches deep, 24-30 inches wide per seat, and 18-20 inches high for the seating area. Add another 18-20 inches for the backrest height. Don’t forget to account for armrests, which usually add 4-6 inches to the overall width.
Pro tip: Use painter’s tape to outline your planned sofa dimensions on the floor. This gives you a real-world perspective of how the finished piece will occupy the space and helps identify any potential issues before you start building.
Choosing Your Style
When designing your modular sofa, you’ll want to consider how it will fit into your living space and lifestyle. The beauty of modular furniture lies in its versatility, offering various space-efficient seating options that can adapt to your needs.
L-shaped configurations work wonderfully in corner spaces and create a natural division in open-plan areas. This setup typically requires three to five modules and provides ample seating while maintaining an inviting conversation area. For smaller rooms, consider a straight-line arrangement that can be separated into individual seats when needed.
U-shaped designs offer maximum seating capacity and create a cozy entertainment hub, perfect for larger families or those who love hosting. If you’re working with limited space, opt for a compact two-piece sectional that can expand later as your needs change.
Consider the depth of your modules carefully. Standard depth ranges from 35 to 40 inches, but you might prefer deeper seats for lounging or shallower ones for a more formal sitting area. The height of your backrest will also impact comfort – higher backs provide more support, while lower profiles create a modern, casual look.
Don’t forget about the arms! Removable armrests give you the flexibility to change your configuration, while built-in ones provide a more permanent, structured appearance. For added functionality, consider incorporating a chaise module or ottoman that can serve as both seating and a footrest.
Remember to plan for future modifications – choosing a modular design means you can add or remove pieces as your space and needs evolve.
Materials and Tools Checklist
Frame Materials
For a sturdy and long-lasting modular sofa, selecting the right frame materials is crucial. The foundation of your sofa starts with kiln-dried hardwood, with oak and maple being excellent choices due to their durability and resistance to warping. Pine can be a more budget-friendly option but may require additional reinforcement.
Your frame will need 2x4s for the main structure and 1x4s for support pieces. Make sure to choose lumber that’s straight and free from knots or defects. For the best stability, opt for plywood that’s at least ¾ inch thick for the seat base and backrest panels.
Essential hardware includes heavy-duty corner brackets, wood screws (2½ inches for main joints, 1¼ inches for smaller connections), and L-brackets for reinforcement. Consider using threaded inserts and bolts for sections that you’ll need to disassemble frequently – this makes your sofa truly modular while maintaining structural integrity.
Don’t forget about the connecting mechanisms between modules. Metal sectional sofa connectors or interlocking brackets work best, allowing you to securely join and separate pieces as needed. For added stability, include adjustable furniture legs with threaded plates – these help level your sofa on uneven floors and protect your flooring.
Pro tip: Always pre-drill your holes to prevent wood splitting, and use wood glue at major joints for extra strength. While it might seem like overkill, these small details make a significant difference in the longevity of your modular sofa.
Upholstery Essentials
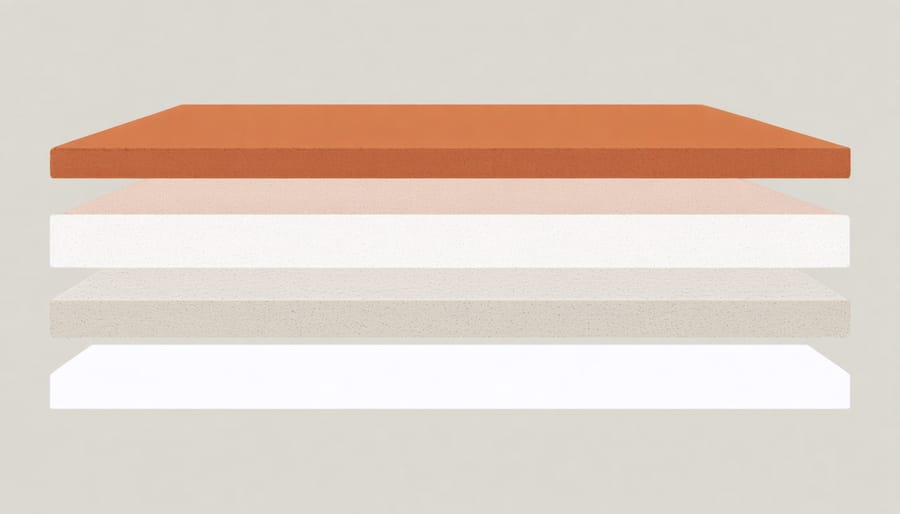
Selecting the right upholstery materials is crucial for creating a comfortable and durable modular sofa. Start with high-density foam for the seat cushions – aim for 2.5 to 3 inches thick with a density rating of at least 1.8 pounds per cubic foot. For the backrest, choose a slightly softer foam around 2 inches thick.
Layer your foam with polyester batting to create smooth, rounded edges and prevent the fabric from wearing against the foam. You’ll need approximately 1 inch of batting wrapped around all foam pieces.
For fabric selection, look for upholstery-grade materials with a minimum of 25,000 double rubs (a durability measure). Popular choices include performance velvet, textured weaves, or synthetic microfiber. Plan to purchase about 15-20 yards of fabric for a standard three-piece modular sofa, allowing extra for pattern matching and mistakes.
Don’t forget the essential supplies: upholstery staples (3/8 inch), fabric scissors, upholstery needles, heavy-duty thread, and buttons if you’re planning on tufting. A pneumatic staple gun will make the job much easier than a manual one.
Building the Base Framework
Creating Individual Modules
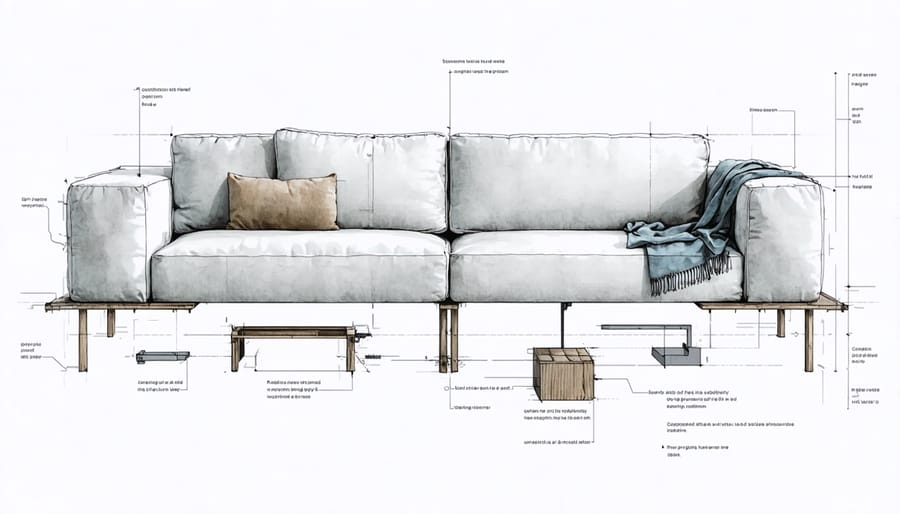
Now that you have your materials ready, let’s dive into building each modular section. Start by constructing the frame using 2×4 lumber. Cut your pieces to size: two lengths for the depth (typically 30 inches), two for the width (around 32 inches), and four vertical supports (about 18 inches). Assemble these pieces to form a rectangular box, using wood glue and screws at each joint for extra stability.
Next, create the seat platform by cutting plywood to fit the frame’s dimensions. Before attaching it, add support beams every 8-10 inches across the width for added strength. Secure the platform to the frame using screws, ensuring they’re countersunk to prevent any uncomfortable bumps.
For the backrest, construct a similar rectangular frame, but sized according to your desired height (usually 24-30 inches). Attach it to the base frame at a slight angle (around 100-105 degrees) for optimal comfort. Remember to add diagonal support braces for stability.
Moving on to the cushioning, cut high-density foam to size for both the seat and backrest. The seat typically needs 4-5 inch thick foam, while the backrest can use 2-3 inch foam. Layer this with batting for a smoother finish. When upholstering, start with the backrest, pulling the fabric tight and securing it with a staple gun. Work from the center outward to avoid wrinkles. For the seat cushion, create a removable cover using a zipper for easy cleaning.
Pro tip: Make paper templates for your upholstery pieces before cutting the actual fabric. This helps prevent costly mistakes and ensures a professional finish. Also, consider adding connector brackets to the sides of each module – these will allow you to securely join sections together while maintaining the flexibility to rearrange your sofa.
Remember to test each module’s stability before moving on to the next one, and keep your measurements consistent across all pieces for a cohesive final product.

Connecting Mechanisms
One of the most crucial aspects of building a modular sofa is ensuring your modules connect securely. The most reliable method is using interlocking brackets or connector plates, which you’ll want to install on the sides of each module where they’ll join together.
Start by marking your connection points – typically, you’ll want three sets of hardware per joining side: one near the top, one in the middle, and one near the bottom. Using a pencil and measuring tape, mark these points about 2 inches from the edge of each module.
For a professional-grade connection, we recommend using metal connector plates with male and female components. These typically come with pre-drilled holes for easy installation. Position your plates, mark your screw holes, and pre-drill with a bit slightly smaller than your screws to prevent splitting the wood.
When installing the hardware, ensure the male components are on one module and the female components are on the corresponding side of the adjacent module. Use wood screws that are long enough to provide a sturdy hold but short enough not to pierce through the other side – usually 1¼ inch screws work well.
Test the connections before fully assembling your sofa. The modules should click together firmly and sit perfectly level. If you notice any misalignment, now is the time to adjust your hardware placement.
Upholstery Process
Adding Comfort Layers
Now that your frame is ready, it’s time to add the layers that make your modular sofa truly comfortable. Start by choosing the right padding materials for your desired comfort level. High-density foam is your foundation – aim for 2-3 inches thick for the seat cushions and 1-2 inches for the backrest.
Cut your foam to size using an electric carving knife for clean, precise edges. Leave about half an inch extra on all sides to account for compression. Before securing the foam, wrap the wooden frame with a thin layer of batting to soften any sharp edges and prevent the foam from catching on the wood.
Attach the foam to your frame using spray adhesive, working in small sections to ensure even coverage. Press firmly and allow it to dry completely. Next, wrap the entire foam-covered structure with a layer of polyester batting. This adds that cloud-like softness and helps smooth out any irregularities in the foam.
For the finishing touch, add an extra layer of batting to areas that bear the most weight, like the seat cushions. Secure all batting layers with a staple gun, pulling the material taut but not so tight that it compresses the foam underneath. Work from the center outward to prevent wrinkles and ensure even distribution.
Pro tip: Consider using different foam densities for various sections – firmer for seats and softer for back cushions – to create the perfect balance of support and comfort.
Fabric Application
Once your frame is complete, it’s time to bring your modular sofa to life with fabric application. Start by laying out your chosen upholstery fabric on a clean, flat surface, ensuring the pattern direction is correct if applicable. Allow for an extra 4-6 inches of fabric on all sides to accommodate proper wrapping and stapling.
Begin with the seat cushions, pulling the fabric taut around the foam and batting layers. Use a pneumatic stapler to secure the fabric at the center of each side first, then work your way outward in a star pattern. This technique prevents unwanted wrinkles and ensures even distribution of the fabric.
For the backrest and armrests, carefully wrap the fabric around corners, creating neat hospital corners similar to making a bed. Pay special attention to seams and pattern matching where separate pieces meet. When stapling, place staples approximately 2 inches apart for secure hold.
Professional tip: Use fabric adhesive spray on curved surfaces before stapling to prevent slipping and achieve a smoother finish. For a polished look, add decorative piping along the edges and seams. Cover any exposed staples with decorative trim or gimp cord for a professional finish.
Remember to test the fabric’s stretch before final application and always work in a well-ventilated area when using adhesives. Double-check all corners and edges for secure attachment before moving on to the next section.
Final Assembly and Maintenance
Module Assembly
Now that your modules are ready, it’s time to bring your modular sofa to life. Start by laying out your base pieces on a clean, level surface according to your planned configuration. Each module should have pre-drilled holes or mounting brackets that align with adjacent pieces.
Before connecting anything permanently, do a test fit of all pieces to ensure proper alignment. Position the modules close together, leaving about a quarter-inch gap between them. This small space allows for minor adjustments during assembly and prevents binding.
To connect the modules, use the hardware that came with your design plans – typically consisting of connector brackets, bolts, and locking mechanisms. Start from one end and work your way across, securing each connection point firmly but not overtightening. A good rule of thumb is to hand-tighten first, then give each bolt a quarter turn with your wrench.
For stability, make sure to connect both the top and bottom mounting points of each module. If your design includes corner pieces, these typically require additional support brackets to maintain structural integrity. Once all modules are connected, give the entire assembly a gentle shake to ensure everything is secure.
Pro tip: Keep your connecting hardware slightly loose until all pieces are in place, then tighten everything systematically from the center outward. This approach helps maintain proper alignment throughout the entire sofa.
Care and Maintenance
Your modular sofa is an investment worth protecting, and with proper care, it can maintain its beauty and functionality for years to come. Following these furniture maintenance tips will help extend its lifespan and keep it looking fresh.
Regular vacuuming is essential to prevent dust and debris from settling into the fabric. Use the upholstery attachment and pay special attention to the seams and crevices where dirt tends to accumulate. For fabric modules, spot-clean spills immediately using a clean, damp cloth and mild soap if necessary. Always test cleaning solutions on a hidden area first.
Rotate your cushions and modules regularly to ensure even wear. This is particularly important for frequently used sections like the main seating areas. Tighten any loose bolts or connectors every few months to maintain structural integrity and prevent wobbling.
If your modular sofa has removable covers, wash them according to the fabric care instructions. For modules without removable covers, consider professional cleaning once a year. Keep your sofa away from direct sunlight to prevent fabric fading, and use throw blankets on high-traffic areas for added protection.
Remember to check and adjust the connecting mechanisms periodically to ensure your modules stay securely in place. Store any spare parts or additional modules in a clean, dry place to maintain their condition for future use.
Building your own modular sofa is an exciting and rewarding project that puts you in control of your home’s comfort and style. As we’ve explored throughout this guide, the key to success lies in careful planning, selecting quality materials, and following each step with patience and attention to detail.
Remember that the beauty of a modular design lies in its flexibility. You can start small with just a few sections and expand your sofa later as your needs change or your skills grow. Don’t be intimidated by the scope of the project – break it down into manageable steps, and you’ll find it’s quite achievable with basic woodworking skills and the right tools.
Take time to source your materials carefully, paying special attention to the quality of your foam and fabric choices, as these will significantly impact the comfort and longevity of your finished piece. Always double-check your measurements and make test cuts when possible to avoid costly mistakes.
Most importantly, don’t rush the process. Quality upholstery work takes time, and it’s better to go slowly and get it right than to cut corners and end up with disappointing results. With the knowledge you’ve gained from this guide, you’re well-equipped to create a beautiful, durable, and comfortable modular sofa that perfectly fits your space and lifestyle.
Ready to get started? Gather your materials, set up your workspace, and begin bringing your custom sofa vision to life. Happy building!