Check salt levels monthly and refill as needed to keep your water softener operating at peak efficiency.
Flush the resin tank every 2-3 months by manually initiating a regeneration cycle to prevent mineral buildup and extend the life of your softener.
Clean the venturi valve and nozzle annually to remove clogs and ensure proper water flow during regeneration – a crucial aspect of DIY maintenance.
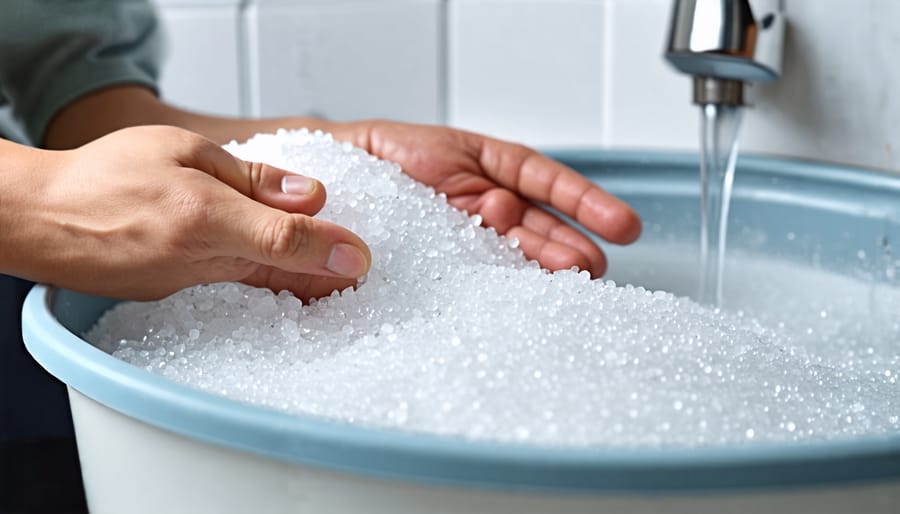
Inspect the brine tank yearly for salt bridges or mushing, breaking them up with a broom handle to maintain consistent salt dissolution and prevent system malfunctions.
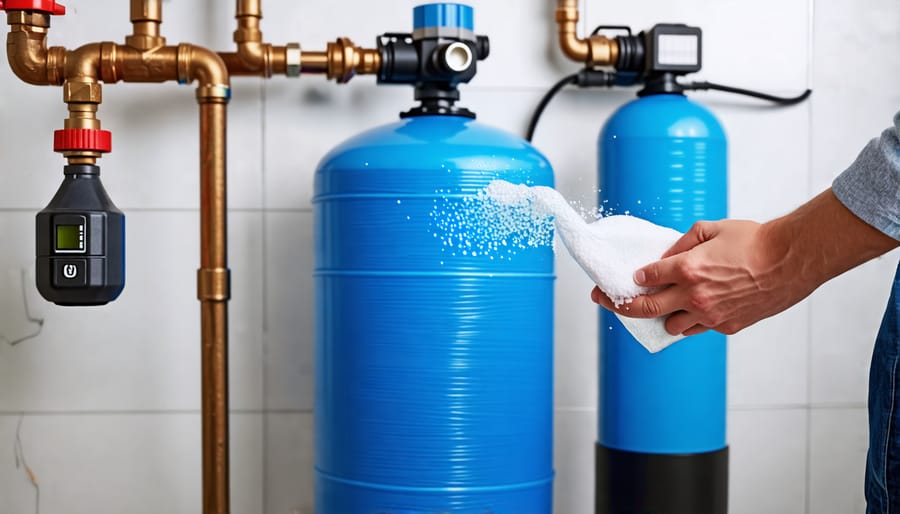
1. Salt Level Check and Refill
Checking the salt level in your water softener’s brine tank is a simple yet essential task. Aim to inspect it at least once a month to ensure your system continues to provide softened water effectively. When the salt level drops below half full, it’s time for a refill.
Before adding salt, remove any leftover chunks or salt bridges that may have formed. These hard crusts can prevent the salt from properly dissolving, impacting your softener’s performance. Break up the clumps with a broom handle or similar tool.
When it comes to choosing the right type of salt, you have a few options:
1. Rock salt: The most affordable choice, rock salt contains more impurities but is suitable for most water softeners. Its larger crystals may require more frequent cleaning of the brine tank.
2. Solar salt: Produced through evaporation of seawater, solar salt is purer than rock salt. It dissolves more easily and leaves less residue, making it a popular choice among homeowners.
3. Evaporated salt pellets: The purest and most expensive option, evaporated salt pellets contain the least amount of impurities. They are highly soluble and leave minimal residue, helping to extend the life of your water softener.
When adding salt, fill the tank about two-thirds full. Be careful not to overfill, as this can lead to a salt bridge forming. Always use salt specifically designed for water softeners to avoid introducing contaminants that could damage your system.
By regularly checking and refilling your brine tank, you’ll ensure a steady supply of softened water and help prolong the life of your water softener. This simple DIY task can save you money on costly repairs and replacements down the line.
2. Cleaning the Brine Tank
Cleaning the brine tank is an important part of water softener maintenance that should be done every 6-12 months, depending on usage. Start by turning off the water supply to the softener and initiating a manual regeneration cycle to drain the tank. Once empty, disconnect the brine line and overflow tube, then carefully remove the salt grid at the bottom.
Using a scoop or wet/dry vacuum, remove any remaining water and debris from the tank. Inspect the inside for salt bridges (hard crusts that prevent salt from dissolving) and salt mush (sludgy buildup). Break up bridges with a broom handle and scoop out the mush. If needed, use a hose to rinse the tank interior, but avoid getting water in the brine line opening.
Next, create a cleaning solution by mixing about 1 gallon of water with 1/4 cup of unscented household bleach. Use a long-handled brush to scrub the tank interior with this mixture, focusing on any stains or residue. Let the solution sit for 15 minutes, then rinse thoroughly with clean water until the bleach smell dissipates.
Reconnect the brine line and overflow tube, replace the salt grid, and refill the tank with fresh salt or potassium chloride pellets. Turn the water supply back on and manually initiate another regeneration cycle to flush the system.
Regular cleaning the brine tank can prevent clogs, salt buildup, and bacteria growth that impact the efficiency of your water softener. By following these simple steps every 6-12 months, you’ll keep your softener running smoothly and avoid costly repairs down the line. Plus, you’ll enjoy the benefits of consistently soft, clean water throughout your home.
3. Inspecting and Adjusting the Control Valve
The control valve is the brain of your water softener, regulating water flow and regeneration cycles. Locate the valve at the top of the resin tank, usually covered by a removable cap or hood. Inspect the valve for any visible damage, leaks, or corrosion. Check that the timer or digital display is functioning properly and the settings match your water hardness and household size.
If you notice issues like constant running, short cycles, or hard water despite regeneration, the control valve may need adjustment. Consult your owner’s manual for specific instructions on accessing valve settings. Common adjustments include regeneration frequency, salt dose, and backwash duration. Gradually make small changes, allowing a few days between each adjustment to assess results.
For example, if your water feels hard, increase the regeneration frequency or salt dose incrementally. If the unit regenerates too often, decrease the frequency to save salt and water. Aim for a balance that provides soft water without wasting resources. Remember, even minor valve adjustments can significantly impact performance, so proceed cautiously and document your changes.
If you encounter persistent problems or cannot resolve issues through adjustments, the control valve may require professional servicing or replacement. However, regular inspection and timely adjustments can often prevent more serious malfunctions and extend the life of your water softener. By understanding your control valve and making informed adjustments, you’ll ensure optimal softener performance and enjoy the benefits of soft water throughout your home.
4. Resin Bed Cleansing
Over time, the resin bed in your water softener can accumulate iron, sediment, and other debris that reduce its efficiency. To restore peak performance, it’s important to periodically clean the resin bed. Start by initiating a manual regeneration cycle, which can be done by pressing and holding the regenerate button on your softener’s control valve. This extra cycle helps flush out built-up impurities.
For deeper cleaning, consider using an iron-removing product specifically designed for water softeners. These products, available at most home improvement stores, help dissolve and remove iron deposits that can clog the resin beads. Simply add the recommended amount of cleaner to the brine tank and allow the softener to go through a complete regeneration cycle.
It’s crucial to follow the manufacturer’s instructions carefully when using any cleaning products. Some may require letting the cleaner solution soak in the resin bed for a specific time before regeneration. After the cleaning cycle, it’s a good idea to perform an additional regeneration to ensure all traces of the cleaner are rinsed away.
Regular resin bed cleaning, along with proper salt levels and routine maintenance, will keep your water softener working efficiently and effectively. By taking these proactive steps, you can extend the life of your softener and continue to enjoy the benefits of soft water throughout your home.
5. Testing Water Hardness and System Efficiency
Testing your water hardness levels before and after the softener is crucial to ensuring your system is working efficiently. To do this, simply purchase a water hardness test kit from your local home improvement store or online retailer. These kits are inexpensive and easy to use, typically involving dipping a test strip into a sample of your water and comparing the color change to a provided chart.
First, test your water before it enters the softener to determine the initial hardness level. Then, test a sample of the softened water from a faucet or appliance connected to the system. If your softener is working properly, the second test should show a significant reduction in hardness, often to near zero.
If the tests reveal that your softened water is still too hard, there are a few potential issues to investigate. Check that your softener has enough salt and that the salt level is set correctly for your household size and water usage. Ensure the brine tank and resin bed are clean and free of debris. If these components are dirty or clogged, the softener may not be able to effectively remove the hard minerals from your water.
If you’ve addressed these issues and your water remains hard, it might be time to consult a professional. A water treatment specialist can help identify any underlying problems with your softener or recommend a more suitable system for your home’s specific needs. Remember, catching and resolving issues early can extend the life of your softener and keep your water quality high.

Conclusion
By following these simple DIY maintenance steps, you can keep your water softener running smoothly and efficiently for years to come. Regular upkeep not only extends the life of your system but also ensures that your home has a consistent supply of soft, high-quality water. Creating a maintenance schedule and sticking to it will help you stay on top of these essential tasks, saving you time and money in the long run. Plus, you’ll have the satisfaction of knowing that you’re taking proactive steps to maintain your home’s plumbing and appliances. So, roll up your sleeves, grab your tools, and take charge of your water softener maintenance today. Your wallet and your home will thank you for it!